As an Amazon Associate, we earn from qualifying purchases. Some links on this site are affiliate links at no extra cost to you. Our recommendations are based on thorough research and editorial judgment.
Preparing Your Cabinets Before LED Installation
Preparing cabinets for LED installation involves careful assessment and planning. Start by measuring cabinet dimensions, accounting for hardware and obstructions. Identify power supply locations, confirming outlet functionality with a voltage tester. Remove all cabinet contents and clean surfaces with rubbing alcohol for best adhesive adhesion. Gather necessary tools and supplies, such as LED strips and connectors. Finally, create a detailed mockup to aid in installation. Understanding these steps is essential for a successful and safe LED setup, leading to brighter, more functional spaces.
Key Takeaways
- Measure cabinet dimensions and clear obstructions to determine the appropriate LED strip lengths needed for installation.
- Remove all cabinet contents to create a clear workspace and prevent damage to items during the installation process.
- Locate and evaluate existing electrical outlets near cabinets for convenient power supply connections during LED installation.
- Clean cabinet surfaces with degreasing cleaner and alcohol to ensure strong adhesion for LED strips.
- Create a visual mockup of the cabinet layout to plan the placement of LED strips and power supplies accurately.
Assessing Your Cabinet Layout
You may be interested


When preparing to install LED lighting, it is essential to assess your cabinet layout effectively. Start by accurately measuring the length of each cabinet section to determine the LED strip length needed. Note the locations of power outlets in or near your cabinets, as these will dictate where to connect the LED system. It may be necessary to divide the lighting into two sections based on your cabinet layout. Create a visual mockup to plan where the transformer and wire routes will be positioned, ensuring efficient access to power. Prior to installation, clear the cabinets of all items to achieve precise measurements and prevent obstructions during the installation process. Each detail contributes greatly to a successful LED lighting setup. Consider installing motion sensor lights for convenient hands-free operation and improved energy efficiency in frequently accessed areas.
Measuring Cabinet Dimensions
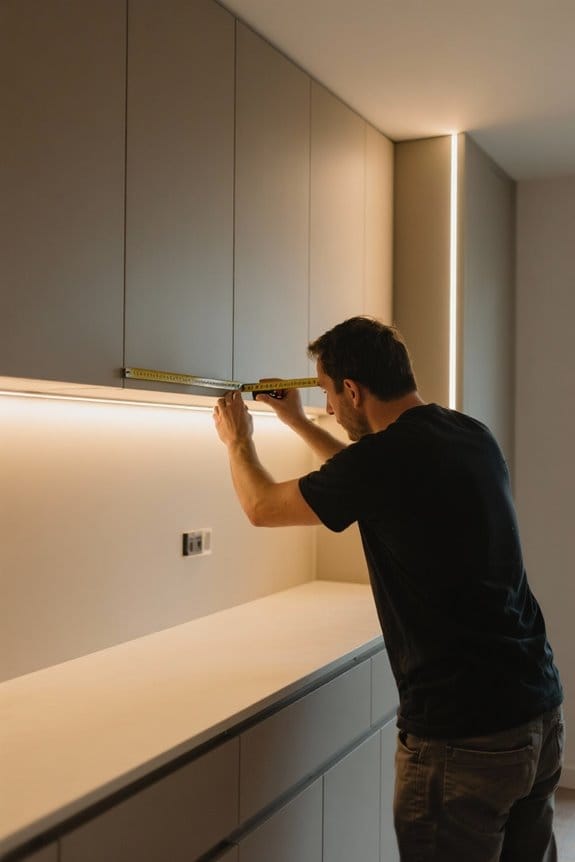
Measuring cabinet dimensions accurately is crucial for successful LED installation. Begin by using a measuring tape to determine the length of each cabinet section designated for LED strip lights. Consider any obstructions, such as hardware or moldings, which may affect the installation. Add all the measurements together to find the total length of LED strips needed. In addition, assess the height and depth of the cabinets to guarantee ideal illumination without interfering with cabinet doors. It is wise to purchase slightly more LED strips than calculated, allowing for any adjustments during installation. Finally, double-check all measurements before cutting the LED strips to avoid material waste and confirm a proper fit for your cabinet sections. Most LED puck lights measure between 2.95 to 4.25 inches in diameter, which should be factored into your spacing calculations.
Recommended Products

Invisiled Pro 1Ft indicator marks every 2 inch for field cutting at the end of a run

Gemini LED tape light output is 3W per foot with easy-to-setup seamless and scalable run lengths up to 24 feet.

▶ Hardwired or Plug-in Installation – Install as permanent LED under cabinet lighting with direct wire, or use a plug-in for quick setup without an electrician. Flexible solution for kitchens, closets, and workspaces
Identifying Power Supply Locations
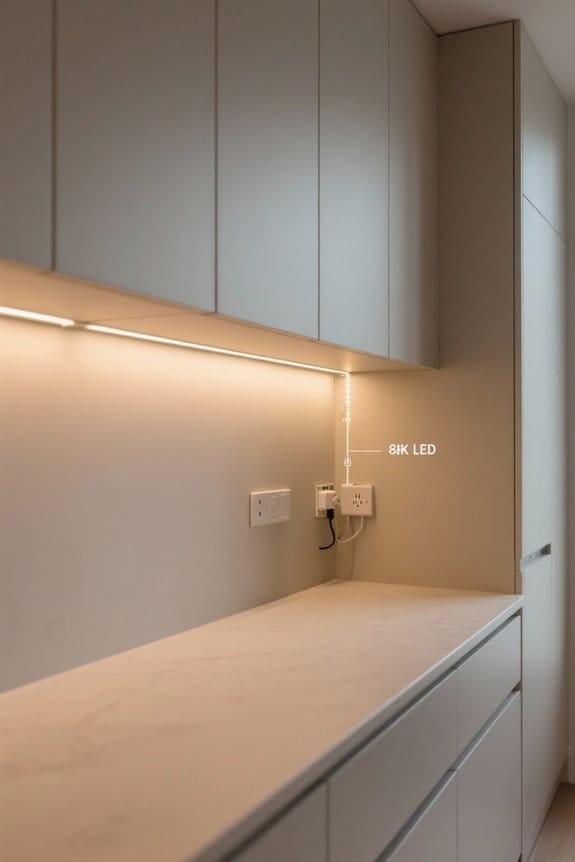
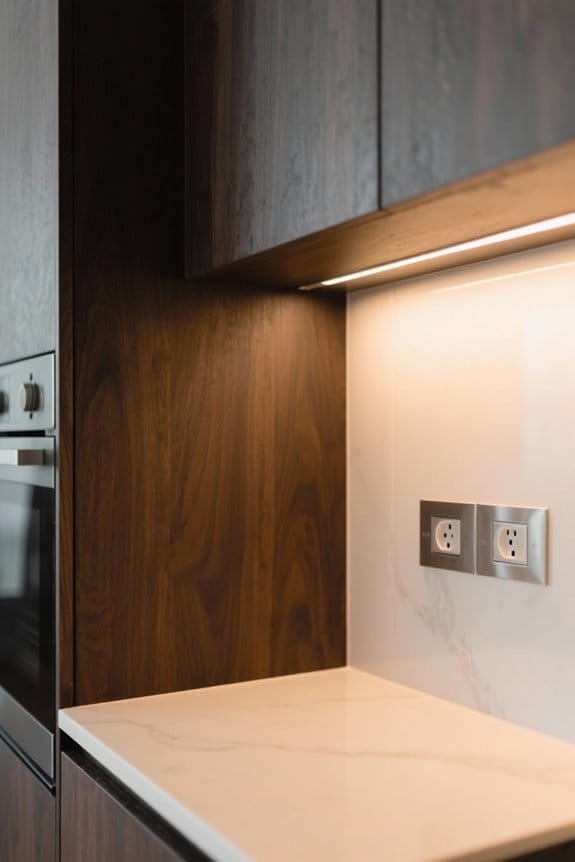
Identifying the right power supply locations is vital for a seamless LED installation. Begin by locating existing electrical outlets above or near your cabinets. These outlets will serve as the primary connections for the LED lights. It is important to use a voltage tester to confirm the functionality and safety of these outlets before proceeding. Evaluate the cabinet layout plan, as this may necessitate extending wiring routes to reach distant outlets. If no outlets are available, you may need to consult an electrician for a safe installation of a new power source. Mark the identified outlet locations on your cabinet layout plan to effectively guide the placement of the LED light strips and guarantee a successful installation. Consider installing USB-powered LED strips which offer convenient connectivity options and promote easier usage with existing USB sockets.
Recommended Products

Free the artist in you with the sleek, smart LED wall panels. Twinkly Squares LED lights lets you explore unlimited ways to transform your space with pixel art, GIFs, widgets, colors & animations.

【Music Pickup Light】Music spectrum light has built-in high-sensitivity microphone pickup, using a dedicated processor, the main frequency is up to 240MHz, and it only takes 0.0005 seconds to process sound signals

【IP65 waterproof led strip lights】this 400ft ((2 rolls of 200ft) led strip lights with IP65 waterproof tube makes the string lights undamaged when used outdoors against splashes or rain. highly recommended for both indoor and outdoor. this led lights for bedroom is perfect for tv wall, cabinets, kitchen, roof, balcony, deck, roof, garde, swimming pool and anywhere you want to glow.
Emptying Cabinet Contents
To facilitate a smooth LED installation, all cabinet contents must be removed before beginning. This step provides a clear workspace and prevents potential damage to fragile items. Emptying the cabinets allows for better access when measuring and installing strip lights or mounting channels along the undersides. During this process, take the opportunity to organize items by type, which simplifies reorganization after installation. For instance, group kitchen tools, pantry goods, or decorative items separately. Confirm that any fragile contents are secured in a safe location to avoid breakage. A thorough emptying also enables effective planning for more functional storage solutions, enhancing the overall cabinetry system post-installation and creating an efficient environment. The clear space will allow for proper installation of magnetic mounting options that many modern expandable LED systems utilize for secure attachment.
Cleaning Cabinet Surfaces

Before proceeding with LED installation, it is essential to clean the cabinet surfaces thoroughly. Start by utilizing a degreasing cleaner to remove dust and grease from the undersides. This step is critical for guaranteeing optimal adhesion for the LED strips. Afterward, wipe the surfaces with rubbing alcohol to eliminate any remaining residues that may interfere with sticking. It is fundamental to allow the cabinet surfaces to dry completely, as moisture can hinder adhesion during installation. Additionally, verify adequate ventilation during cleaning to prevent fume buildup, promoting a safe working environment. Following these steps will prepare the cabinet surfaces effectively, setting a solid foundation for a successful LED installation. Proper cleaning is key to achieving durable and lasting results. Quality surface preparation ensures your energy efficient LEDs can reduce power consumption by up to 85% while maintaining optimal performance.
Removing Obstacles and Checking for Damage
Start by clearing the cabinet undersides of all items and debris, guaranteeing an unobstructed surface to facilitate proper adhesion for the LED strip lights. Next, inspect the surface for any obstructions, such as brackets or hardware. These can impair installation, so identify and remove them as necessary. Additionally, check for signs of damage, including chipping or warping of the cabinet material. Such issues could hinder both installation and the functionality of the LED lighting. Finally, verify adequate ventilation in the area, reducing the risk of fumes from adhesives or cleaning products. A clean surface, free from grease and dust, is essential for maximum adhesion when you install the LED strips effectively. When planning your installation, ensure your chosen LED strips are compatible with a dimming control system to enable customizable lighting levels for different activities and occasions.
Planning LED Strip Placement
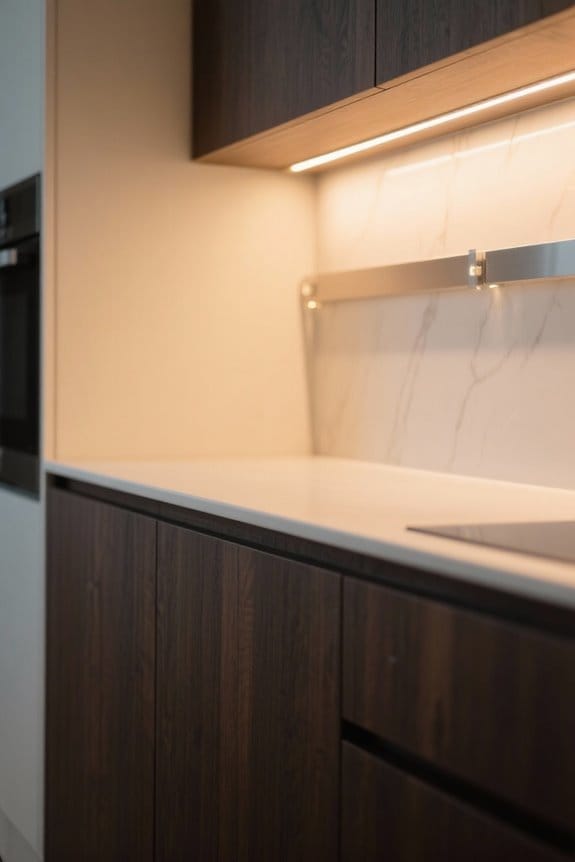
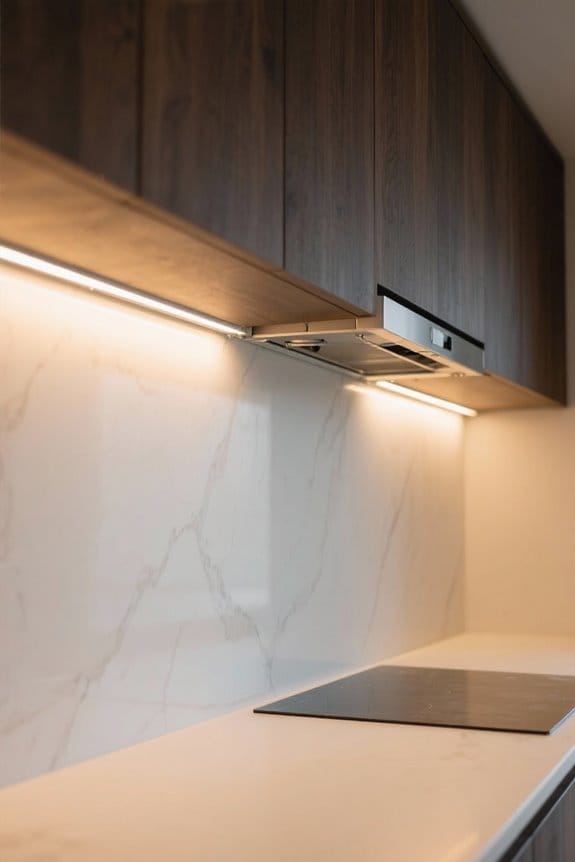
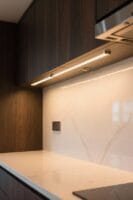
Effective planning of LED strip placement guarantees ideal lighting throughout the kitchen. Begin by measuring the length of each cabinet section accurately to calculate the necessary amount of LED strips. Create a mockup layout to visualize strip positioning, ensuring even illumination. A distance of 1-2 inches between the LED strips and the cabinet face frames is essential to avoid casting shadows on countertops. Consider any obstructions, such as hardware or pipes, when determining light placement. Prioritize areas that require enhanced visibility, like above sinks and prep spaces, to optimize task lighting. This strategic planning not only improves functionality but also elevates the kitchen’s overall aesthetic, enhancing both usability and enjoyment. Modern ultra-thin LED fixtures offer sleek profiles that seamlessly integrate into cabinet spaces while providing up to 5000 lumens of brightness.
Recommended Products

𝗗𝗶𝗺𝗺𝗮𝗯𝗹𝗲 𝗥𝗚𝗕 𝗕𝗮𝗰𝗸𝗹𝗶𝘁+𝗙𝗿𝗼𝗻𝘁 𝗟𝗶𝗴𝗵𝘁𝗲𝗱 - ACEMIRO lighted medicine cabinet integrates fashion and fantasy with 3000k-6000k 3-color temperature adjustment + Colorful RGB backlight modes(11 multi-color selections). The backlight and front light could be stepless dimmable and adjusted from 10% to 100% brightness to match your preferences while provide sufficient light source. Give an artistic touch of luxury to your home décor.

MAXIMIZE SPACE EFFICIENTLY:This queen murphy bed and hideaway bed folds compactly into the cabinet frame to free up floor area perfectly. The practical wall bed works well in apartments, guest rooms and home offices. As a functional murphy bed kit and queen size murphy bed, it turns any room into a multi-purpose zone, making this queen murphy bed cabinet an ideal space-saving solution for limited living areas

Elegant Modern Design: Five pieces modern design living room table sets advocate the beauty of matching, adding a touch of contemporary style to your home, including 1x TV stand, 1x Coffee Table, 2 x End Tables
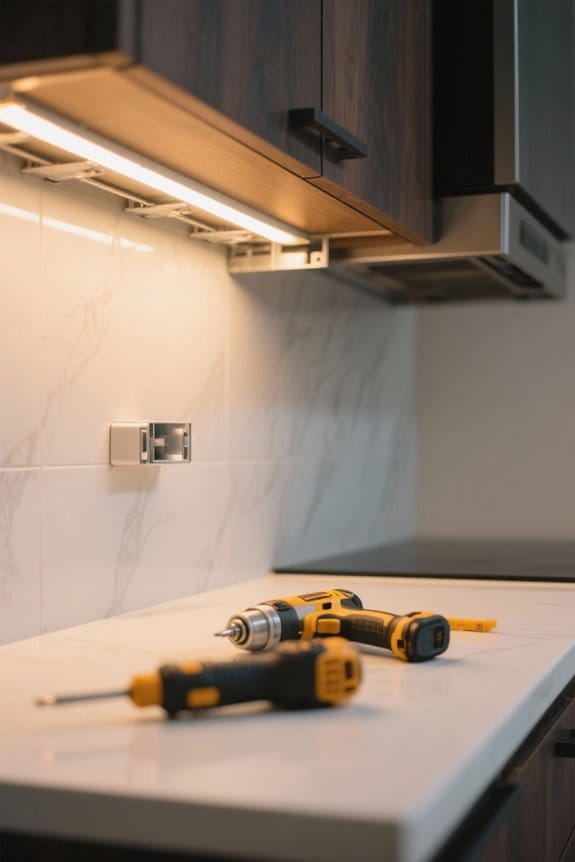
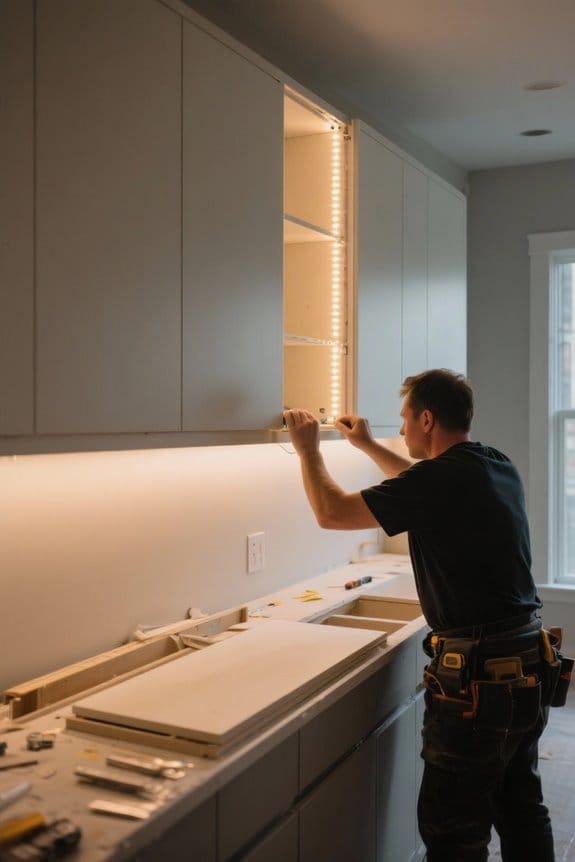
Gathering Required Tools and Supplies
Gathering the right tools and supplies is essential for a successful LED installation. Begin by compiling necessary supplies, including Accent Series LED strips and compatible power supplies, such as plug-in adapters. To enhance efficiency, you will need Single Color Solderless Grip Connectors and a Gemini Mounting Channel Kit. Essential tools include a drill, scissors, wire cutter, and stripper. Confirm that your workplace is well-lit and organized to facilitate a smooth installation process. Measure the cabinet lengths carefully, as this will help determine the required lengths of LED strips, minimizing waste. Additionally, verify the locations of power outlets within the cabinets to guarantee adequate electrical access during installation. Preparation leads to effective execution. Consider installing fixtures with CRI rating 90+ to ensure accurate color representation in your kitchen workspace.
Recommended Products

【Robust Aluminized Steel Construction】- Engineered with a robust aluminized steel frame, our pergolas for patios provides superior structural stability compared to standard lightweight shelters. Reinforced frame handles winds up to 70 mph and heavy snow. The surface is treated with a protective powder-coated finish that enhances resistance against rust, corrosion, and scratching, ensuring outdoor gazebo maintains its integrity and appearance in various outdoor environments.

[CARGO-READY WITH CROSSBARS] Equipped with two adjustable heavy-duty aluminum crossbars (150lbs capacity), Allows you to carry bikes, kayaks, or solar panels directly on top of your tent. Never leave your adventure gear behind again.

[Fitment]:For 2015-2016-2017-2018-2019 GMC Sierra 2500/3500(The sensor holes in the front and rear bumper don't apply to the original)
Reviewing Safety Precautions
Before proceeding with the installation of LED lighting, it is important to prioritize safety precautions. Always turn off power at the breaker box to guarantee safety throughout the process. Use a voltage tester to confirm that power is off at all outlets and fixtures you plan to work on. It is essential to wear safety glasses when drilling or cutting materials, as debris can pose serious risks to your eyes. Additionally, keep your workspace clear of hazards and obstructions to prevent accidents. For ideal adhesion of LED strips with adhesive backing, prepare your cabinet surfaces by using cleaning agents, such as degreasing cleaners and rubbing alcohol, to remove dust and grease effectively. Taking these steps will enhance safety and improve the installation outcome. Consider installing magnetic strip options that allow for easy removal during maintenance while providing secure mounting.
Creating a Mockup for Installation
Creating a mockup for LED installation can markedly enhance the organization and effectiveness of the project. Begin by sketching your cabinet layout on paper or using modeling software. Clearly mark the positions of LED strips and power supplies. Incorporate specific measurements of cabinet lengths and depths to determine the necessary lengths of LED strips for each area. Highlight potential obstacles in your mockup—such as cabinet support beams or existing electrical wiring—that could impact installation. This detailed approach allows for smoother execution and identifies the need for a professional electrician if no existing outlets are available for power connection. A well-crafted mockup streamlines the installation process, ensuring precision and efficiency throughout the project. Consider marking your preferred color temperature range between 3000K to 6500K to achieve the desired ambiance in different cabinet sections.
Frequently Asked Questions
Where Do You Put LED Strip Lights Under Cabinets?
LED strip lights should be strategically placed along the cabinet’s underside. Proper placement options enhance lighting effects, while wiring considerations guarantee safety. Adjust brightness levels and color temperature, incorporating various control methods for ideal ambiance and functionality.
What Are the Chances of LED Lights Catching Fire?
The chances of LED lights catching fire are minimal, thanks to effective heat dissipation. Strict adherence to installation tips and voltage requirements, alongside addressing electrical concerns, enhances fire safety in lighting placement, mitigating risks considerably.
What Needs to Be Done Before Cabinets Are Installed?
Before installing cabinets, accurate cabinet measurements must be taken, electrical wiring prepared, surfaces cleaned, mounting brackets secured, light placement planned, and finish options selected to guarantee proper functionality and aesthetics in the final setup.
How Much Does It Cost to Install Under Cabinet LED Strip Lighting?
The cost to install under cabinet LED strip lighting dances between $100 and $300. Factors include DIY installation savings, professional service fees, budget planning, light color choices, and energy savings that illuminate future bills.