As an Amazon Associate, we earn from qualifying purchases. Some links on this site are affiliate links at no extra cost to you. Our recommendations are based on thorough research and editorial judgment.

How to Install LED Strips on Angled Cabinets
To install LED strips on angled cabinets, measure the cabinet dimensions accurately to identify the required length. Choose LED strips with a minimum brightness of 200 lumens per foot and a color temperature between 3000K to 5000K. Clean the surfaces with a degreaser and denatured alcohol for ideal adhesion. Cut the strips to fit, ensuring a proper connection while maintaining polarity. Secure the strips with adhesive or mounting clips. For improved usability, consider integrating a dimmer switch. Further insights await for a successful installation.
Key Takeaways
- Measure the angles and lengths of cabinet sections to determine the appropriate LED strip lengths for optimal coverage.
- Clean surfaces with a degreasing cleaner followed by rubbing alcohol to ensure strong adhesive bonding.
- Choose flexible LED strips with a minimum of 200 lumens per foot for bright, effective task lighting.
- Connect strips ensuring correct polarity and use a dimmer switch for adjustable brightness options; avoid exceeding 16 feet to prevent voltage drop.
- Position strips to minimize shadows and ensure even spacing for consistent lighting while maintaining cabinet functionality.
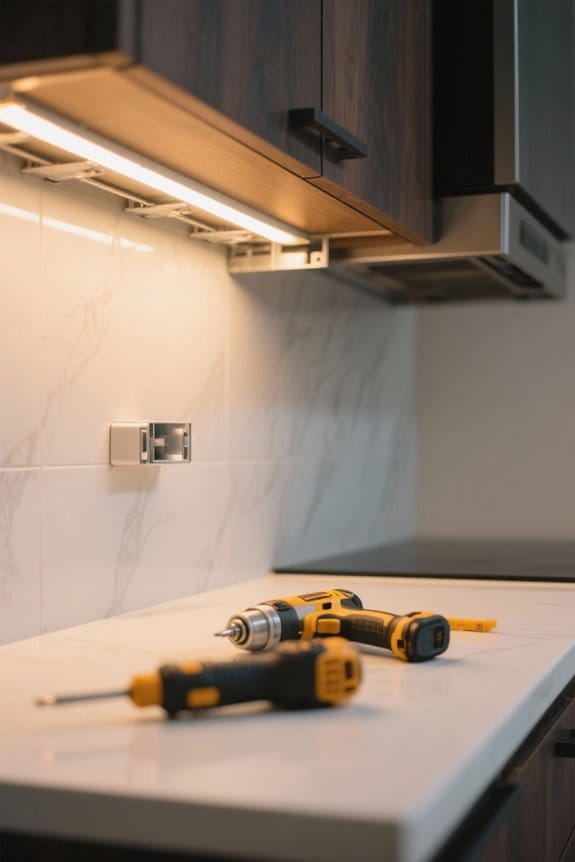
Tools and Materials Needed for Installation
You may be interested

Before beginning the installation process, it is crucial to gather the necessary tools and materials. Essential tools include a voltage tester, wire stripper, measuring tape, and scissors or utility knife. These facilitate accurate adjustments and guarantee safety when working with electrical components. For best installation of LED strip lighting, select strips compatible with the cabinet design, alongside a power supply to guarantee proper operation. The adhesive backing on the strips aids in secure attachment, yet adhesive backing may require additional support from mounting clips for longevity. To enhance functionality, consider smart controls like a dimmer switch. Additionally, prepare surfaces with a clean cloth and denatured alcohol for best adhesion, guaranteeing the best lighting performance. Modern LED strips can provide energy savings benefits of up to 90% compared to traditional lighting options.
Recommended Products

Visibility - The tempered glass top and front offer excellent visibility of products from multiple angles.

Visibility - The tempered glass top and front offer excellent visibility of products from multiple angles.

Space Design :70" W x 18" D x 38" H - Reatil Display Case provides ample space to display merchandise.Two tempered adjustable glass shelves allow flexibility in displaying items of varying sizes.
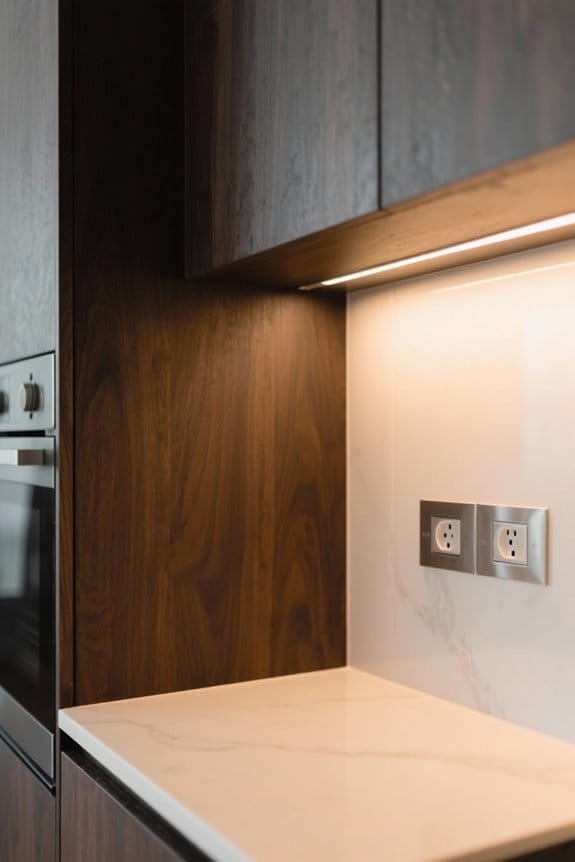
Measuring and Preparing the Angled Cabinets
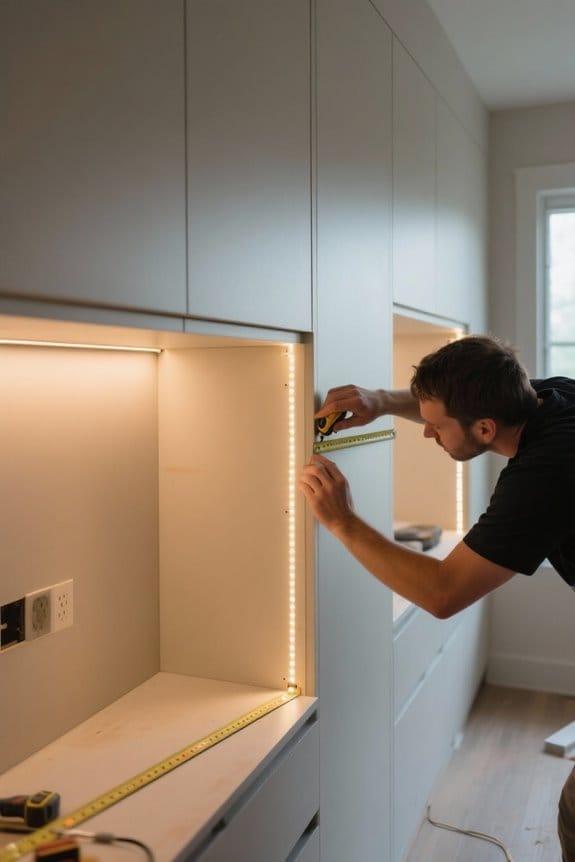
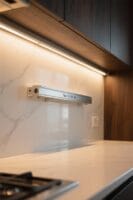
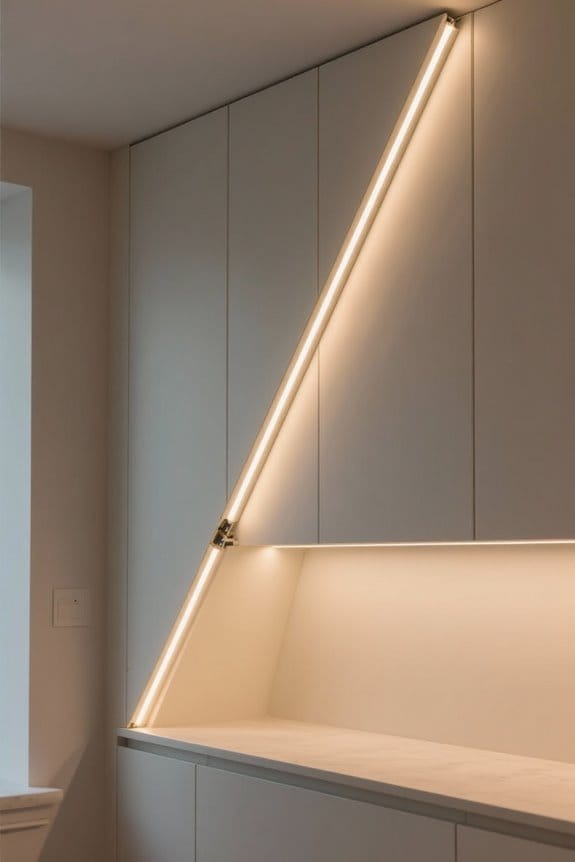
Accurate measurement is crucial when installing LED strips on angled cabinets to guarantee proper fit and performance. Begin by measuring the angle and length of each cabinet section to determine the required length of LED strips. Use a flexible measuring tape to accurately gauge the cabinet’s depth and height for ideal light coverage. Consider the angle of the cabinet face to ascertain effective light distribution on the countertop while minimizing shadows. Identify any obstructions, such as hardware or unique cabinet features that may hinder installation. Prior to placing the LED strips, clean surfaces thoroughly with a degreasing cleaner to secure strong adhesion. Proper preparation is essential to achieving a well-lit and visually appealing cabinet installation. For optimal task lighting performance, select LED strips that produce 700 lumens brightness to ensure sufficient illumination of your workspace.
Choosing the Right LED Strip Lights
Choosing the right LED strip lights for angled cabinets involves several significant considerations to achieve ideal lighting and aesthetic appeal. First, prioritize brightness; aim for a minimum of 200 lumens per foot to guarantee proper illumination for tasks. Next, consider the color temperature; select options between 3000K to 5000K to harmonize with existing room lighting, creating a cohesive ambiance. Additionally, assess how well the strip lights complement the cabinet materials and angles of installation, reducing shadows and enhancing visual interest. Flexibility is essential; make sure the LED strips can be cut to fit specific angles accurately. Finally, opt for strip lights with adhesive backing or appropriate mounting clips, securing and lasting installation on your cabinetry surfaces. For optimal energy efficiency, select LED strips that deliver 70% energy savings compared to traditional lighting solutions while maintaining high brightness output.
Recommended Products

InvisiLED PRO 1ft 40 Pack Tape Light in 2700K Warm White. Integrating high performance and innovative technology in a professional grade low profile lighting solution, InvisiLED Pro offers dimmable, energy efficient LED tape that installs easily to illuminate fine wood cabinets

Gemini LED tape light output is 3W per foot with easy-to-setup seamless and scalable run lengths up to 24 feet.

Super Bright LED Strip -> 120 LEDs/M SMD2835 of high Illumination are adopted for this 110-130V led strip light. Higher manufacturing skills of series-parallel wiring configuration make a more stable configuration and uniform glow distribution, hence named as ProSelect LED light strip.
Cleaning and Prepping the Surface for Adhesion
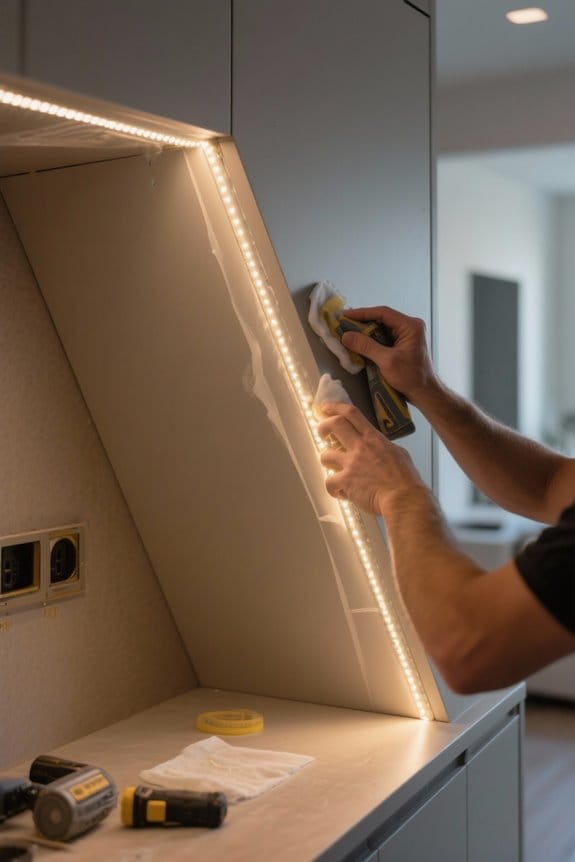
Cleaning the surface of angled cabinets is essential for ensuring strong adhesion of LED strips. Begin the cleaning process by applying a degreasing cleaner to the undersides of the cabinets. This will effectively remove dust, grease, and residues that could hinder adhesion. After thorough cleaning, wipe the surfaces with rubbing alcohol, ensuring that any moisture evaporates completely. It is vital to use a soft cloth to dry the surfaces thoroughly, as a wet surface can prevent the adhesive backing from sealing properly. Additionally, check for any obstructions or damage that may interfere with the installation. Adequate ventilation should be maintained throughout this process to promote safe working conditions and enhance the effectiveness of adhesion. Using double-sided tape installation methods similar to JUSJUBR lighting systems can provide additional mounting security for angled surfaces.
Cutting and Aligning LED Strips
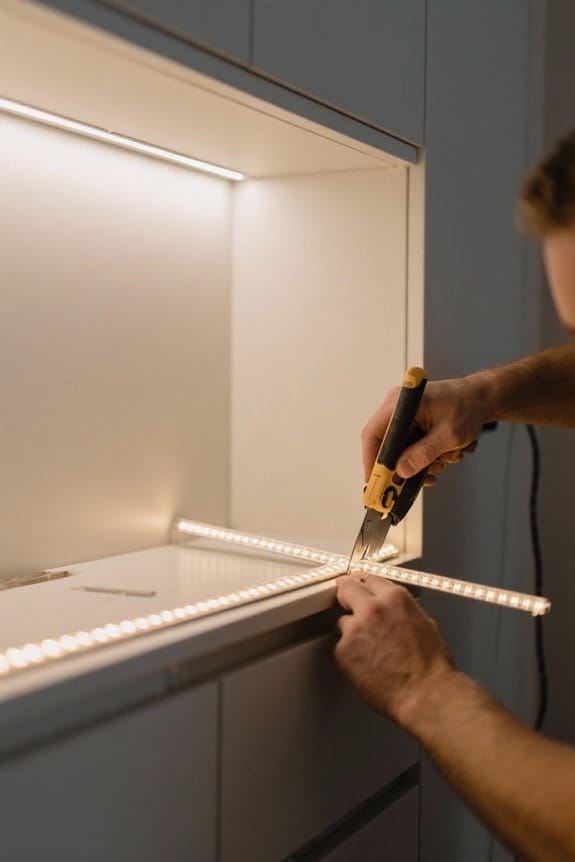
Starting the process of cutting and aligning LED strips requires careful measurement and planning. First, accurately measure the length of the cabinet edges, adjusting for any angles. Next, utilize a sharp pair of scissors or a utility knife, cutting the LED strips at the designated points marked by dashed lines. This guarantees clean edges, essential for precise aligning. When working with angled surfaces, visualize the layout beforehand to confirm that the strips fit snugly along the edge. Apply the adhesive backing smoothly, ensuring no bubbles exist, allowing for unobstructed light distribution. Finally, consider securing the strips further with mounting clips on angled sections to prevent slipping due to gravity or uneven surfaces. Each step enhances the installation’s effectiveness. For optimal visibility in your workspace, select strips with adjustable color temperature ranging from warm to cool tones.
Recommended Products

SCIENTIFIC DESIGN -- Double Row LEDs Chip, V-shape 270° beam angle design, shop LED light provides 6000K daylight illumination

【SCIENTIFIC DESIGN】 - Double Row LEDs Chip, V-shape 270 Degree angle design, shop LED light provides 6000K cool white illumination

Come with 20PCS V shape LED Aluminum Channel and matching milky white lens, each segment is 2M (6.6FT). The led aluminum channels can be cut down to any length
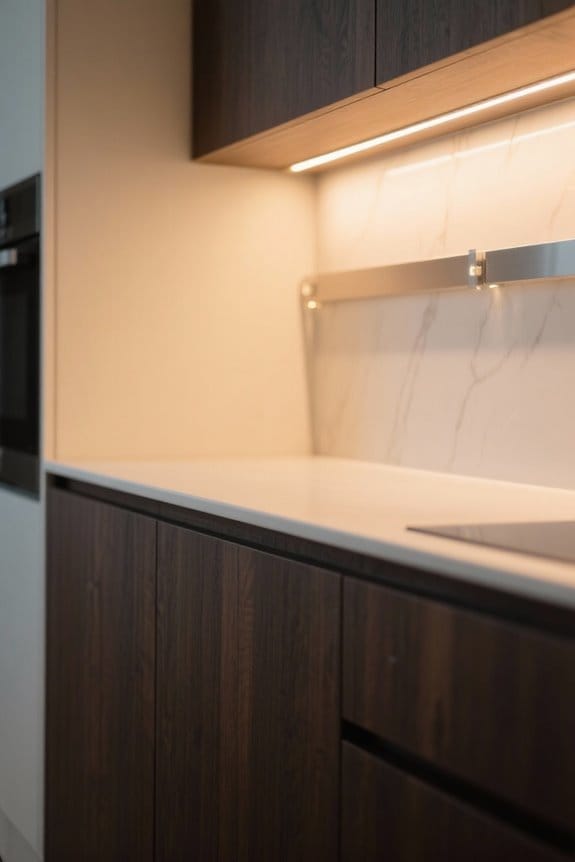
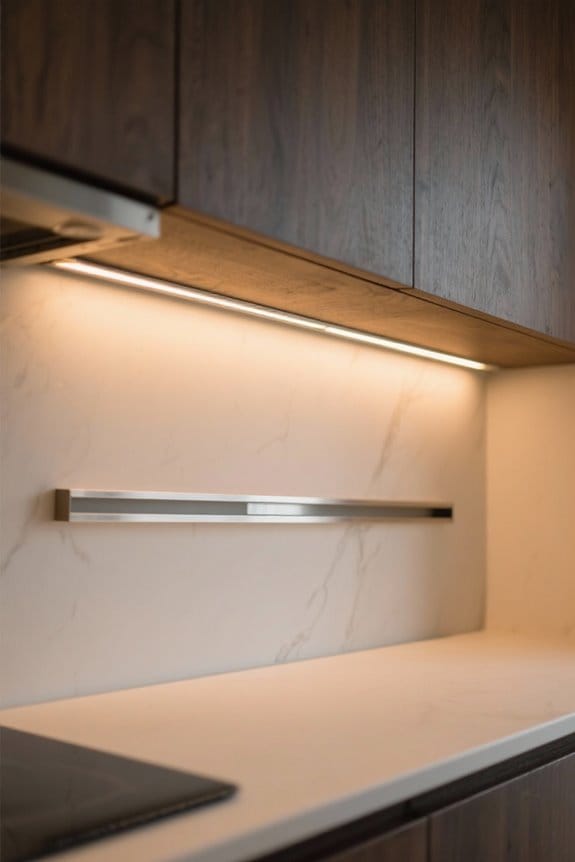
Mounting the LED Strips Securely
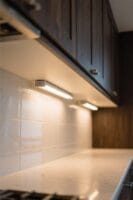
Properly mounting LED strips on angled cabinets is essential for enhancing both functionality and aesthetics. Begin by cleaning the mounting surface thoroughly with rubbing alcohol for ideal adhesion. Use the 3M adhesive backing on flat areas; apply firm pressure to achieve a secure hold. For irregular or highly angled surfaces, consider employing mounting clips or channels to provide additional support. Ascertain the LED strips are aligned correctly to prevent misalignment, which can lead to uneven light distribution. Before finalizing the installation, test the light function to confirm proper operation. This step allows for adjustments in placement or orientation, guaranteeing that the LED strips enhance the desired area effectively. Following these guidelines will improve your cabinet lighting experience. For optimal visibility, select LED strips that provide 120-150 lumens of brightness for effective task lighting in cabinet spaces.
Recommended Products
Easy Installation - Easily fitted instead of traditional fluorescent tube lamps.Package comes with all you need which includes 5.9inch pig tail cable,clamps and screws,these led bulb tube lamp can be interconnected with provided connecto

【Super Bright & Energy Efficient】- Our 8ft led shop light has 120watts, 960pcs LED chips, up to 20000LM output, with excellent efficiency of 160 LM/W, U-shape 4 Rows 300 degree beam angle to illuminate every dark corner.

3312 Densely Packed LEDs with Full 360-Degree beam angle omnidirectional Illumination. Delivering a full and even lighting experience. Ideal for elevating the ambiance in your yard, garden, patio, or during seasonal displays, the uniform spread of light from every angle makes these lights exceptionally effective in providing a lively and warm ambiance for any occasion
Wiring and Connecting Your LED Lighting
After successfully mounting LED strips, attention must now turn to wiring and connecting the lighting system. Begin by gathering essential tools such as fish tape for maneuvering wires through tight spaces and wire strippers for secure connections. Remember, do not exceed the typical maximum length of 16 feet for LED strips, to avoid voltage drop issues. It is vital to connect the LED lights in accordance with their polarity. Ascertain the positive terminal of the power supply connects to the positive end of the strip. Consider incorporating a dimmer switch compatible with LED lights for enhanced control over brightness. Once wired, regularly check and secure all connections to prevent damage from movement or heat buildup. For optimal safety and performance, use extension cables made with oxygen-free copper to ensure superior electrical conductivity.
Recommended Products

【Robust Aluminized Steel Construction】- Engineered with a robust aluminized steel frame, our pergolas for patios provides superior structural stability compared to standard lightweight shelters. Reinforced frame handles winds up to 70 mph and heavy snow. The surface is treated with a protective powder-coated finish that enhances resistance against rust, corrosion, and scratching, ensuring outdoor gazebo maintains its integrity and appearance in various outdoor environments.

RV AWNING DIMENSIONS — 20 x 8 Feet.Actual Fabric Dimensions: 19 Feet 2 Inches x 8 Feet.Both fabric roller and fabric lock rail are spliced and installed, which is more stable to use.

Solid Brass Construction - The Gardenreet landscape spotlight with solid die-cast brass construction is more durable and reliable than aluminum and plastic fixtures; bronze landscape lights will not rust, age, or peel over time and last a lifetime with a single installation.High-end brass finish, Classical glossy colors that shine in the light and make you win the praise and envy of neighbors
Testing the Lights and Final Adjustments
Upon energizing the power supply, the LED strips should be tested to verify all connections function correctly and securely. Begin by checking for even illumination across the surfaces. Observe brightness levels from various angles, particularly near the countertop and backsplash. If flickering occurs, this may indicate connection issues or polarity mistakes. Adjust the positioning of the LED strips during final adjustments to enhance areas lacking adequate brightness. Aim for consistent lighting by making certain the strips are evenly spaced and properly aligned. Finally, manage wires and cables neatly to prevent exposure and maintain a clean installation appearance. These steps guarantee the finished product not only looks professional but functions effectively in the intended space. Consider installing lights with adjustable brightness levels from 25% to 100% to achieve optimal task lighting for different times of day.
Frequently Asked Questions
How to Get LED Strips Around Corners?
To achieve seamless corner installation, one should utilize flexible LED strips and corner connectors. By comparing adhesive options, individuals can guarantee superior adhesion, creating creative lighting solutions that enhance aesthetics while maintaining consistent illumination around corners.
How to Install LED Strip Lights in Cabinets?
To install LED strip lights in cabinets, one should consider lighting placement techniques, explore various cabinet lighting ideas, choose appropriate adhesive options available, and select light color choices to achieve the desired ambiance and functionality.
Do LED Strip Lights Get Hot Enough to Start a Fire?
LED strip lights typically do not generate enough heat to pose fire safety concerns when installed correctly. Adhering to LED installation precautions, following LED usage tips, and ensuring proper ventilation help mitigate potential risks associated with LED heat generation.
Why Do My LED Strips Keep Falling Off?
LED strips may fall off due to insufficient surface preparation, poor adhesive qualities, or improper adhering methods. Additionally, heat management and environmental conditions can compromise adhesion, undermining the effectiveness of the installation over time.